

GraphQL is a query language for APIs that can help your engineering team move faster. Just one set of developers can build and maintain the overall schema, and everyone else gets a friendly interface for accessing/mutating the data. The queries are written like this:
{
  hero {
    name
    height
  }
}
And it gives back exactly the data you requested:
{
  "hero": {
      "name": "Luke Skywalker",
      "height": 1.72
  }
}
Your queries can be as simple as the one above or they can include filtering, pagination, joins, and a lot more.
What technologies are we using?
Today, we’re going to look at setting up a GraphQL API without needing to write a GraphQL schema, with PostGraphile.
We will then use PropelAuth to add multi-tenant user authentication—meaning our users will be members of organizations.
Next, we’ll set up Postgres Row Level Locks to enforce that users can only access or modify data in their own organization.
And finally, we’ll build a very basic React app that can query the data using Apollo.
What are we building?
We’ll build a simple application for businesses to manage their own internal wikis. Employees at a company will be able to view wiki pages that their coworkers have created and people outside of a company won’t be able to view any of the wiki pages for that company.
We’ll focus primarily on the backend and leave the pretty UIs for another day.
A forkable starter template
The coolest part of this whole project is how extensible it is. You can fork the starter template, edit and apply the schema.sql file, enter a few environment variables, and you’ll have a full secure, multi-tenant GraphQL API and a Next.js App where you can write your queries.
Any changes that you make the the schema will automatically update your GraphQL API.
But, if you want to see the details of how the starter template was made, keep reading.
Making the initial schema
PostGraphile allows us to instantly create a GraphQL API from a Postgres schema, so we’ll start by setting up Postgres and creating our schema. Setting up Postgres can be done with Docker, their native applications, and many other ways.
For managing the schema, you’ll likely want to use a tool like dbmate or Flyway, which can help you update the database over time. For this tutorial, we’ll just create it directly:
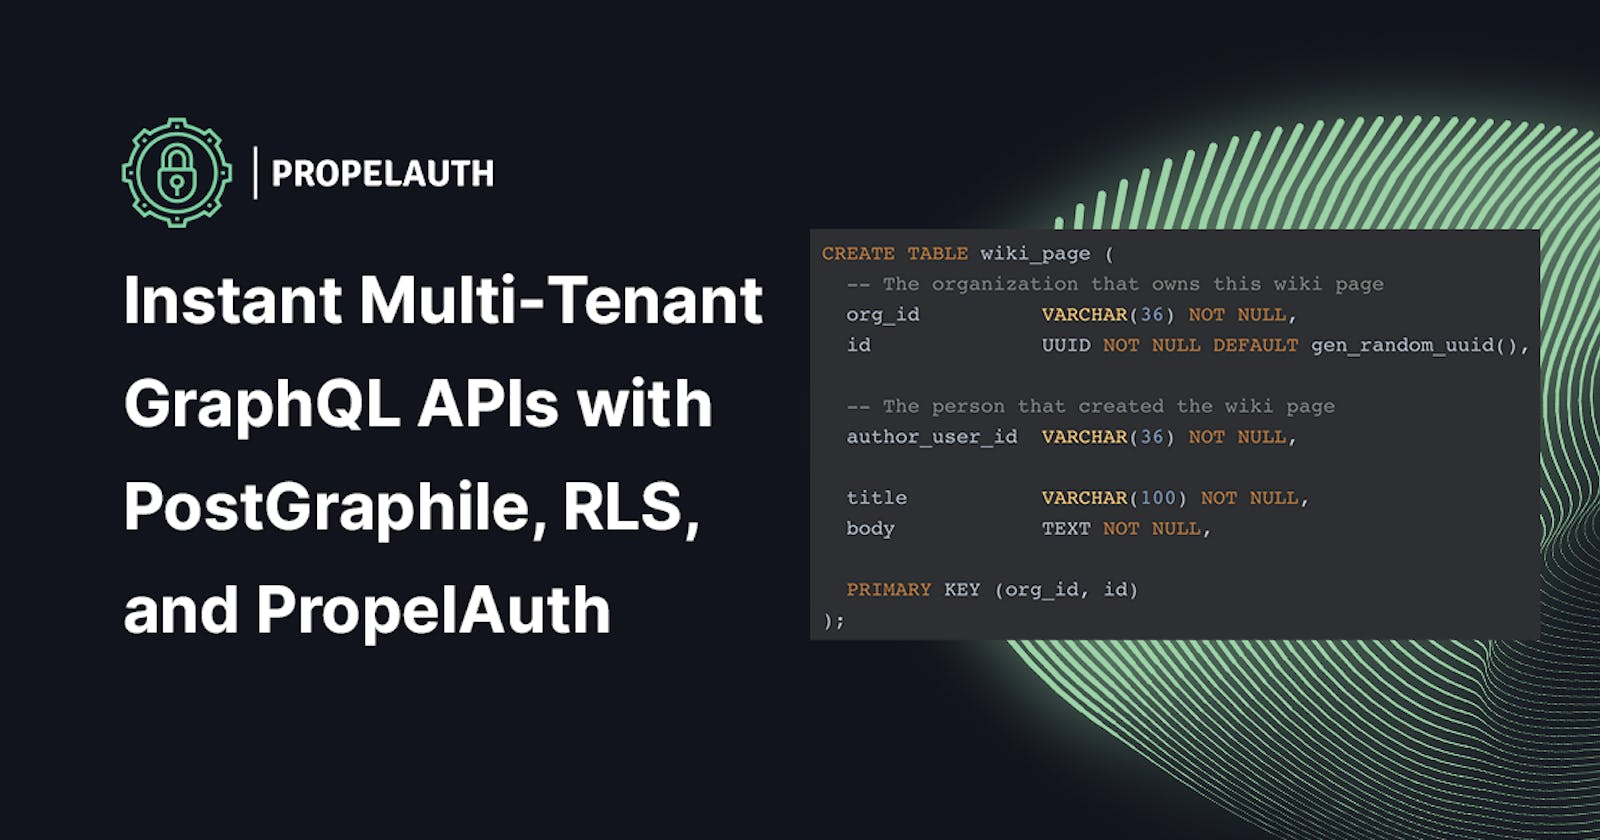
CREATE TABLE wiki_page (
  -- The organization that owns this wiki page
  org_id          VARCHAR(36) NOT NULL,
  id              UUID NOT NULL DEFAULT gen_random_uuid(),

  -- The person that created the wiki page
  author_user_id  VARCHAR(36) NOT NULL,

  title           VARCHAR(100) NOT NULL,
  body            TEXT NOT NULL,

  PRIMARY KEY (org_id, id)
);
Running PostGraphile as a library
We can run PostGraphile directly, but we’ll want to add our own authentication middleware that is aware of both the user, their organization (tenant), and their role within that organization.
To set up our project, we install Express, PostGraphile, and pg-simlify-inflector, which PostGraphile recommends for all new projects
$ yarn add express postgraphile @graphile-contrib/pg-simplify-inflector
Then we’ll make an index.js file which creates a full GraphQL API for us based on our schema:
const express = require("express");
const {postgraphile} = require("postgraphile");
const PgSimplifyInflectorPlugin = require("@graphile-contrib/pg-simplify-inflector");

const app = express();

const postgraphileMiddleware = postgraphile(
    process.env.DATABASE_URL,
    "public",
    {
        appendPlugins: [PgSimplifyInflectorPlugin],
    }
);

app.use(postgraphileMiddleware);

app.listen(process.env.PORT || 3001);
You can also specify additional flags alongside appendPlugins, like graphiql: true or enhanceGraphiql: true, which provide you with nice UIs to build queries and view your schema:

Adding Multi-tenant authentication to our GraphQL API
Currently, we have a full API but we have no users, tenants/organizations, or authorization at all. For this, we’ll use PropelAuth, which provides a full set of self service UIs for our users so they can sign up, create organizations, invite their coworkers, manage roles, and more.

PropelAuth hosts these UIs for us and all we have to do is integrate our backend and frontend. You can follow the getting started guide and we’ll skip ahead to integrating our backend.
In a new file, propelauth.js, we’ll export all our authentication functions:
const propelAuth = require("@propelauth/express");
module.exports = propelAuth.initAuth({
    authUrl: process.env.PROPELAUTH_AUTH_URL,
    apiKey: process.env.PROPELAUTH_API_KEY,
})
We can then import just what we need, which in this case is the requireOrgMember middleware:
const {requireOrgMember} = require("./propelauth")

// Auth middleware that verifies the request's access token
//   and checks that user is in the organization
//   they specified in the header
const propelAuthMiddleware = requireOrgMember({
    orgIdExtractor: req => req.headers["x-org-id"]
})
This creates an Express middleware that requires an access token in the request (something that we’ll get when we build out the frontend) and it will make sure the access token is valid. Additionally, it will make sure that this user is a member of the organization specified by the header x-org-id, otherwise the request is rejected.
What happens if we update our PostGraphile middleware like this?
app.use(propelAuthMiddleware, postgraphileMiddleware);
This will ensure only valid users can make any GraphQL calls, however, it isn’t checking the data within the query at all. There’s nothing preventing us from loading another tenant’s Wiki pages.
Postgres Row Level Security
Since GraphQL queries can get fairly complicated, enforcing constraints on the query itself would be really challenging. We can instead enforce constraints much more easily at the Postgres level.
In order to do that though, we need some way to pass meta information (like the user’s ID and organization ID) to Postgres. Luckily, PostGraphile has a simple way of doing that:
const postgraphileMiddleware = postgraphile(
    process.env.DATABASE_URL || "postgres://postgres:postgres@127.0.0.1:5432/postgraphile?sslmode=disable",
    "public",
    {
        appendPlugins: [PgSimplifyInflectorPlugin],
        pgSettings: async req => ({
            'role': 'member',
            'propelauth.user_id': `${req.user.userId}`,
            'propelauth.org_id': `${req.org.orgId}`,
        }),
    }
);
Anything without a period (role) is interpreted as a Postgres setting, so our query will be performed by the member role within Postgres.
For the other settings (propelauth.user_id and propelauth.org_id), we can fetch these within our queries with current_setting('propelauth.org_id')
Let’s breakdown what we need to protect this table:
-- 1
ALTER TABLE wiki_page ENABLE ROW LEVEL SECURITY;

-- 2
CREATE ROLE member;
GRANT SELECT, INSERT, UPDATE, DELETE ON wiki_page TO member;

-- 3
CREATE POLICY only_access_your_own_org ON wiki_page
    USING (org_id = current_setting('propelauth.org_id'))
    WITH CHECK (org_id = current_setting('propelauth.org_id')
        AND author_user_id = current_setting('propelauth.user_id'));
- This enables RLS for the table, allowing us to restrict access.
- We create a new role within Postgres member and explicitly give them access to wiki_page. Later on, we’ll see how we can use different roles for different access patterns.
- A policy which has two important components:
- USING allows us to determine if an existing row can be accessed.
- WITH CHECK allows us to determine if a new or updated row should be created. This is why we have the extra check to ensure they can only specify their own user id.
Surprisingly, this is all we need to get everything working. Let’s now test out our code.
Building a simple React app with an Authentication GraphQL provider
$ npx create-react-app postgraphile-frontend
$ cd postgraphile-frontend
$ yarn add @propelauth/react @apollo/client graphql
$ yarn start
We’re using @propelauth/react to check if our users are logged in and @apollo/client and graphql to make requests.
Following the documentation for React, we’ll set up our RequiredAuthProvider. It manages authentication information and all other components fetch from it. We’re using the RequiredAuthProvider because it automatically redirects non-logged in users. This helps simplify the rest of the application because we know we are only ever dealing with logged-in users. If you want the option of handling non-logged in users, you can use the AuthProvider.
const root = ReactDOM.createRoot(document.getElementById('root'));
root.render(
    <React.StrictMode>
        <RequiredAuthProvider authUrl="AUTH_URL">
            <App/>
        </RequiredAuthProvider>
    </React.StrictMode>
);
Then, we’ll want to set up an ApolloProvider which allows us to make GraphQL requests anywhere in our application. We do, however, want to add our user’s access token and the organization they are a member of (which we saw the backend relies on). We’ll do this by wrapping the ApolloProvider into our own AuthenticatedApolloProvider.
const httpLink = createHttpLink({
    uri: `${process.env.NEXT_PUBLIC_BACKEND_BASE_URL}/graphql`,
});

const accessTokenToAuthLink = (accessToken: string, orgId: string) => setContext((_, { headers }) => {
    return {
        headers: {
            ...headers,
            authorization: accessToken ? `Bearer ${accessToken}` : "",
            "x-org-id": orgId,
        }
    }
});

interface AuthenticatedApolloProviderProps extends WithLoggedInAuthInfoProps {
    children?: ReactNode
}

const AuthenticatedApolloProvider = withRequiredAuthInfo((props: AuthenticatedApolloProviderProps) => {
    const {redirectToCreateOrgPage} = useRedirectFunctions()

    // There are a number of strategies to get an organization for the user to operate within
    // In this case, we'll defer to the user's choice by checking which org they have selected
    // We can use `orgHelper.selectOrg` separately to let the user pick
    const selectedOrg = props.orgHelper.getSelectedOrg();

    // If the user has no orgs, prompt them to create or join one
    if (!selectedOrg) {
        redirectToCreateOrgPage();
        return <></>
    }

    const authLink = accessTokenToAuthLink(props.accessToken, selectedOrg.orgId)

    const client = new ApolloClient({
        link: authLink.concat(httpLink),
        cache: new InMemoryCache()
    });

    return <ApolloProvider client={client}>
        {props.children}
    </ApolloProvider>
});
And then we go back and set up this provider too:
root.render(
    <React.StrictMode>
        <RequiredAuthProvider authUrl="AUTH_URL">
            <AuthenticatedApolloProvider>
                <App/>
            </AuthenticatedApolloProvider>
        </RequiredAuthProvider>
    </React.StrictMode>
);
Now, whenever we make a GraphQL request, it’ll automatically include both our user’s access token and the organization specified by orgHelper.getSelectedOrg(). If our user logs out, they’ll automatically be redirected back to the login screen.
Making authenticated GraphQL calls
We won’t spend too much time on the frontend, but let’s look at how to fetch all the WikiPages within our organization:
import {useQuery, gql} from '@apollo/client';

const LIST_WIKI_PAGES = gql`
query ListWikiPages {
  wikiPages {
    nodes {
      id
      orgId
      title
      body
      createdAt
    }
  }
}
`;

function App() {
    const {loading, error, data} = useQuery(LIST_WIKI_PAGES);

    if (loading) return <p>Loading...</p>;
    if (error) return <p>Error</p>;

    return (
        <div className="App"><pre>{JSON.stringify(data, null, 2)}</pre></div>
    );
}

export default App;
Without any data, this will just return an empty list:

For our next test, let’s go into our database and insert data for a made up organization:
INSERT INTO wiki_page (org_id, author_user_id, title, body)
VALUES ('nonsense', 'alsononsense', 'hello', 'you should not see this');
When we refresh the page, we still see an empty list. This is because, while there is data available, we do not have access to view that data. Let’s create some data that we do have access to by creating a GraphQL mutation.
import {gql, useMutation} from "@apollo/client";
import {useState} from "react";
import {withRequiredAuthInfo} from "@propelauth/react";

const CREATE_WIKI_PAGE = gql`
mutation CreateWikiPage($orgId: String!, $authorUserId: String!, $title: String!, $body: String!) {
  createWikiPage(
    input: {wikiPage: {orgId: $orgId, authorUserId: $authorUserId, title: $title, body: $body}}
  ) {
    wikiPage {
      id
    }
  }
}
`;

const CreateWikiPage = withRequiredAuthInfo((props) => {
    const [title, setTitle] = useState("")
    const [body, setBody] = useState("")
    const [mutateFunction, {loading, error}] = useMutation(CREATE_WIKI_PAGE);

    if (loading) return 'Submitting...';
    if (error) return `Submission error! ${error.message}`;

    const onSubmit = (e) => {
        e.preventDefault();
        mutateFunction({
            variables: {
                orgId: props.orgHelper.getSelectedOrg().orgId,
                authorUserId: props.user.userId,
                title: title,
                body: body,
            }
        })
    }

    return <form onSubmit={onSubmit}>
        <input type="text" value={title} onChange={e => setTitle(e.target.value)} />
        <textarea value={body} onChange={e => setBody(e.target.value)} />
        <button type="submit">Submit</button>
    </form>
});
export default CreateWikiPage;
If we submit this form, it will call a GraphQL mutation which passes in our title, body, userId and orgId. Since the data is in our organization, we can then view this data from our original query:

But wait! What happens if a malicious user specifies a different orgId within the query? You can test this out by hardcoding an organization in the code snippet above, and you’ll get this error:

Tightening up our Schema
One small point that’s worth making is that PostGraphile gives us a GraphQL API for our entire schema. If you have any sensitive information in your database, you’ll need to be very careful about exposing it.
PostGraphile suggests using namespaces to hide sensitive tables. You can also use views to expose subsets of that sensitive data.
However, if you look at our schema above, we actually have an annoying bug: our users can specify their own IDs or createdAt timestamps. To solve this problem, PostGraphile includes smart tags, so we can make sure that IDs/createdAt cannot be created or modified by our users.
A quick note on Role Based Access Control (RBAC)
In the above example, we only made a single role within Postgres and then we made a policy that applied to everyone. We could, however, have made multiple roles in Postgres to match our roles within PropelAuth.
We could then use req.org.userRole to pass along the user’s role instead of the hardcoded value, and we can make more complicated policies. For example, maybe Admins are allowed to delete other people’s pages but Members are not.
Summary
By choosing technologies wisely, we have a tech stack that’s perfect for a new start up or side project. We have:
- GraphQL APIs that are autogenerated based off of our Postgres schema
- A multi-tenant user authentication system that enables our users to send invitations, setup SAML connections, manage roles, and more.
- Postgres RLS enforcing multi-tenant authorization at the database level.
- A React application where we can write a GraphQL query anywhere and it’ll automatically be scoped to an organization and authenticated.
You can fork the starter template, edit and apply the schema.sql file, enter a few environment variables, and you’ll have a full secure, multi-tenant GraphQL API and a Next.js App where you can write your queries.